https://drive.google.com/file/d/0B7ZemmqjP5xfOUFnY3Q0Q3BoTjg/edit?usp=sharing
ea sports logo history
Monday, 20 January 2014
Saturday, 11 January 2014
P1, P3 - Kaiju Battle Scene Tutorial
Before you can start the tutorial, there are a few basic hardware and software requirements. These are as follows:
A machine with the minimum specification for Adobe Photoshop (CC)
Photoshop CS6 (or newer)
A Basic mouse and keyboard
A monitor with clear color differentiation
You will also need the resource pack, which can be downloaded HERE
How to make it
1) Open all 3 of the images found in the resource pack, using Photoshop, and go to the tab with the image of the lizard.
2) Use the quick selection tool to highlight the head of the lizard.
.png)
.jpg)
3) Press Ctrl + C to copy the selection, and move to the picture of the Bridge. Then press Ctrl + V to paste the lizard head onto the canvas.
.jpg)
4) Highlight the layer containing the lizard and press Ctrl + T to open Free Transform. Rotate the lizard 90 degrees clockwise by clicking outside of the box and dragging the mouse around the outside of the box. Then hold Shift on your keyboard and drag one corner of the box towards the opposite corner of the box to scale down the image to about 33%

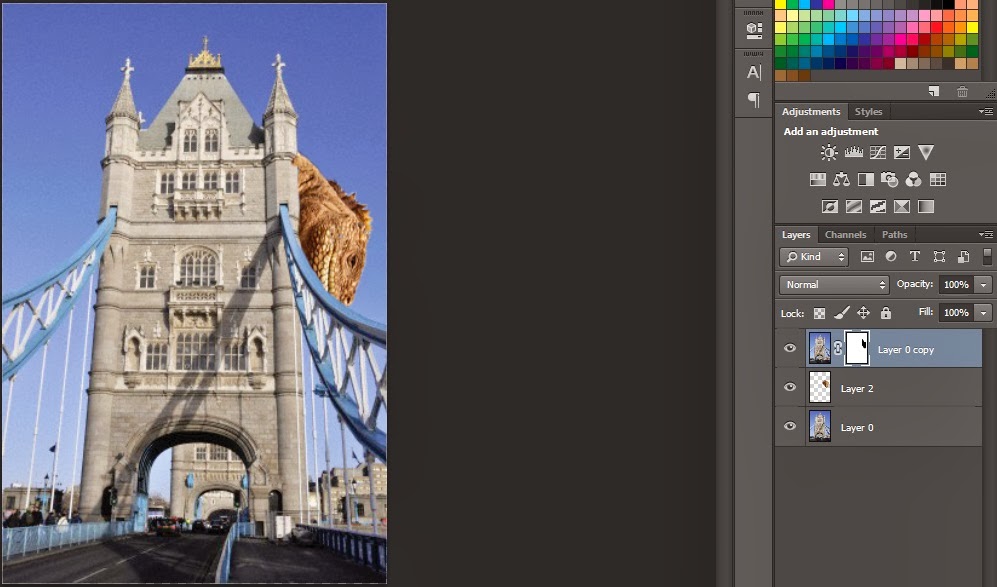
4) Right click on the layer containing the bridge, and click duplicate. then drag the layer above the layer containing the lizard in the layer list. Highlight the duplicated layer of the bridge and click the 'create layer mask' button under the layer list (seen bellow on the left)


 5) click the white image next to the thumbnail of layer 0 copy and select the brush tool (as seen on the right) and then select the color black and rub out the area where you placed the lizard's head.

 6) select the polygonal selection tool(image on right of page) and create a triangle shape with the point on the lizard's eye and the opposite corners at the bottom left of the canvas. Create a new layer by pressing shift + Ctrl + N and fill the selected area white using the paint bucket tool (seen on the left of the page)

7) double click the thumbnail of the white filled area. Tick the 'outer glow' box. Then click the text 'outer glow' to bring up the properties menu. change the color to red and the opacity to 100%. Click ok and then Duplicate this layer. Hold Ctrl and click on both of the lazer beam layers, and change the opacity to 50% using the drop down slider above the layer selection area of the screen.

 8) go to the canvas of the explosion, and double click the padlock on the background layer. then select the magic want tool (image on right of page) and set the tolerance to 10 on the toolbar at the top of the window. Then click on any black space around the border of the window and pres DEL on your keyboard.

9) copy the entirety of the canvas (select -> all) and press ctrl + C. Change back to the tab with the bridge image on and press ctrl + V. Move the explosion layer to the top of the layer list and then press ctrl + t. hold shift and resize the image to cover about 25% of the canvas, then move the explosion to the bottom left of the screen
10) Click the text tool ( image on right) and add text to the top of the screen saying 'Kaiju Crusher'. drag it to the center of the screen and you have completed the poster. Congratulations!


Hardware and Software Roles


Image Sources:
http://www.corbisimages.com/stock-photo/royalty-free/42-37594714/explosion-of-colorful-sand-on-black-background?popup=1
http://www.corbisimages.com/stock-photo/royalty-free/42-33752300/tower-bridge-over-the-river-thames-london?popup=1
http://www.corbisimages.com/stock-photo/royalty-free/42-53277276/galapagos-land-iguana-conolophus-subcristatus?popup=1
Hardware and software roles: https://drive.google.com/file/d/0B7ZemmqjP5xfcEl0SUtFX21LRG8/edit?usp=sharing
A machine with the minimum specification for Adobe Photoshop (CC)
Photoshop CS6 (or newer)
A Basic mouse and keyboard
A monitor with clear color differentiation
You will also need the resource pack, which can be downloaded HERE
How to make it
1) Open all 3 of the images found in the resource pack, using Photoshop, and go to the tab with the image of the lizard.
2) Use the quick selection tool to highlight the head of the lizard.
3) Press Ctrl + C to copy the selection, and move to the picture of the Bridge. Then press Ctrl + V to paste the lizard head onto the canvas.
4) Highlight the layer containing the lizard and press Ctrl + T to open Free Transform. Rotate the lizard 90 degrees clockwise by clicking outside of the box and dragging the mouse around the outside of the box. Then hold Shift on your keyboard and drag one corner of the box towards the opposite corner of the box to scale down the image to about 33%
4) Right click on the layer containing the bridge, and click duplicate. then drag the layer above the layer containing the lizard in the layer list. Highlight the duplicated layer of the bridge and click the 'create layer mask' button under the layer list (seen bellow on the left)
 5) click the white image next to the thumbnail of layer 0 copy and select the brush tool (as seen on the right) and then select the color black and rub out the area where you placed the lizard's head.
 6) select the polygonal selection tool(image on right of page) and create a triangle shape with the point on the lizard's eye and the opposite corners at the bottom left of the canvas. Create a new layer by pressing shift + Ctrl + N and fill the selected area white using the paint bucket tool (seen on the left of the page)
7) double click the thumbnail of the white filled area. Tick the 'outer glow' box. Then click the text 'outer glow' to bring up the properties menu. change the color to red and the opacity to 100%. Click ok and then Duplicate this layer. Hold Ctrl and click on both of the lazer beam layers, and change the opacity to 50% using the drop down slider above the layer selection area of the screen.
 8) go to the canvas of the explosion, and double click the padlock on the background layer. then select the magic want tool (image on right of page) and set the tolerance to 10 on the toolbar at the top of the window. Then click on any black space around the border of the window and pres DEL on your keyboard.
9) copy the entirety of the canvas (select -> all) and press ctrl + C. Change back to the tab with the bridge image on and press ctrl + V. Move the explosion layer to the top of the layer list and then press ctrl + t. hold shift and resize the image to cover about 25% of the canvas, then move the explosion to the bottom left of the screen
10) Click the text tool ( image on right) and add text to the top of the screen saying 'Kaiju Crusher'. drag it to the center of the screen and you have completed the poster. Congratulations!
Hardware and Software Roles
Image Sources:
http://www.corbisimages.com/stock-photo/royalty-free/42-37594714/explosion-of-colorful-sand-on-black-background?popup=1
http://www.corbisimages.com/stock-photo/royalty-free/42-33752300/tower-bridge-over-the-river-thames-london?popup=1
http://www.corbisimages.com/stock-photo/royalty-free/42-53277276/galapagos-land-iguana-conolophus-subcristatus?popup=1
Hardware and software roles: https://drive.google.com/file/d/0B7ZemmqjP5xfcEl0SUtFX21LRG8/edit?usp=sharing
Subscribe to:
Comments (Atom)